Description
This article details the VI Engineering recommended steps to take when replacing both Cisco and Brocade switch entities in VirtualWisdom.
Resolution
If Links on the switch are being monitored by Hardware Performance Probes
-
Before the switch replacement go to Settings → Hardware Diagnostics
-
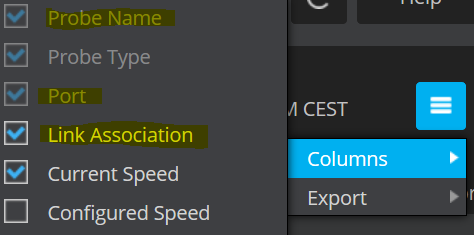
Confirm that the Probe Name, Port, and Link Association columns are visible on the page
-
If not, click the hamburger icon, select Column, and tick boxes to select them
-
Click the hamburger icon, select Export and then export a CSV to preserve a record of the link associations
-
Proceed to the switch replacement instructions below
Seed Switch Replacement Instructions for VirtualWisdom
-
It is not possible to replace the seed switch in an Integration
-
If the seed switch is being replaced, the Integration must be deleted and recreated using the replacement switch as the seed switch
-
Note/take a screenshot of the existing Configuration settings
-
Export the list of switches and their subscription state in the SNMP Sources tab
-
Delete the Integration
-
Take the switch offline and physically remove it
-
Configure new switch in fabric and set it up with the same credentials as the old switch
-
Confirm in the Inventory that all entities associated with the deleted Integration have been archived
-
Create a new Integration using the details of the replacement switch
-
Confirm that the switches present in the new Integration match those of the old Integration
-
Perform a full discovery
-
Reconfigure Hardware Performance Probe link associations as needed
-
Use the hardware diagnostics export taken before the replacement for guidance
-
Update the tap-in spreadsheet to reflect the latest changes
Switch Replacement Instructions for VirtualWisdom
-
Go to Settings → Integrations and choose View for the Integration type that contains the switch that will be replaced (Brocade or Cisco SAN)
-
Click the SAN Integration that contains the switch and the SNMP sources tab
-
Unsubscribe the switch that will be removed
-
Un-configure the switch that will be removed
-
Select Save to make the changes persistent
-
Take the switch offline and physically remove it
-
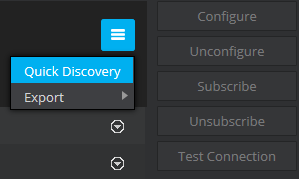
Perform a quick discovery in the Integration to confirm that the switch is no longer visible
-
Perform a full discovery to archive the removed switch and its entities, confirm in Inventory the entities are no longer present
-
Configure new switch in fabric and set it up with the same credentials as the old switch
-
Run a quick discovery in the Integration to display the new switch in VirtualWisdom
-
Configure the new switch
-
Subscribe the new switch
-
Select Save to make the changes persistent
-
Perform a full discovery to un-archive the entities migrated to the new switch and discover any new ones
-
Reconfigure Hardware Performance Probe link associations as needed
-
Use the hardware diagnostics export taken before the replacement for guidance
-
Update the tap-in spreadsheet to reflect the latest changes